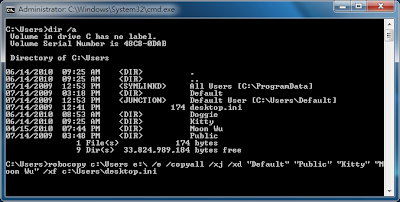
如果我們要讓新的使用者登入系統後,預設都能同樣
的設定(例如桌面圖示、捷徑、IE首頁),必需讓設定套到Default Profile上,如此在新的帳戶登入時,會去copy Default
Profile的設定而套用下來。在以往,我們習慣在以下的畫面中,將已經設定好的profile copy至Default User上。

在Windows 7裏,要使用http://support.microsoft.com/kb/973289 的方式才能達到這個需求。將步驟整理如下:
1.登入一個帳戶,做完所有的設定。
2.將以下的文件存成Unattend.xml檔,放在C:\下。
<?xml version="1.0" encoding="utf-8"?>
<unattend xmlns="urn:schemas-microsoft-com:unattend">
<settings pass="specialize">
<component name="Microsoft-Windows-Shell-Setup" processorArchitecture="x86" publicKeyToken="31bf3856ad364e35" language="neutral" versionScope="nonSxS" xmlns:wcm="http://schemas.microsoft.com/WMIConfig/2002/State" xmlns:xsi="http://www.w3.org/2001/XMLSchema-instance">
<CopyProfile>true</CopyProfile>
</component>
</settings>
<cpi:offlineImage cpi:source="wim:d:/sources/install.wim#Windows 7 ENTERPRISE" xmlns:cpi="urn:schemas-microsoft-com:cpi" />
</unattend>
3.開啟CMD,將路徑切到C:\Windows\system32\sysprep。
4. 執行sysprep.exe /generalize /unattend:c:\unattend.xml。
5.重新開機,會做初始化的動作,系統即會依照步驟4去讀取unattend.xml檔,並且完成設定。